PhotobucketPhotobucketPhotobucketPhotobucketPhotobucket
Showing posts with label cheap. Show all posts

Monday, October 7, 2013

Skull Cake Stand

Hello.
Been a minute since I have blogged.
Sorry.
But did a little Halloween craft on the cheap the other day and thought I would share.

What you need:
Plastic plate from Target for $1.99
Glitter skulls from Michael's $1.99 for a package {I used my 40% off coupon to make them even cheaper} X2
A candle holder, I had one on hand.
Some gorilla glue
Hot glue gun


First thing first, gorilla glue the plate and stand together, add something heavy to the top and let sit till dry.


Then with a hot glue gun get to adding some skulls around the edge.


And thats it.  
Doesn't get easier then that I say.


Enjoy!

Monday, June 17, 2013

Clean Eating Chia Seed Coconut Granola


So to say its been awhile is an understatement, but man has it been awhile.
Sorry about that, but you know life can get in the way of things.
I hope to be back on a more regular basis.
Fingers crossed anyways. 

I have eating the yummiest cereal lately, Nature's Path Chia Plus Coconut Chia Granola.
As much as I love it, swallowing the price has not been easy.
Whole Food has this bad boy for $4.39, Target a little cheaper.

So I decided I wanted to try my hand at making something similar for half the price.
Yes if you don't have some of the items up front it will cost you a bit.
But once you have them on hand you can make batches upon batches.

Clean Eating Chia Seed Coconut Granola

Here is what you will need:
3 cups Rolled Oats
1/4 cup Raw Honey
1 tsp vanilla
1 Tbsp FlaxSeed Meal 
1 Tbsp Chai Seeds
1/4 cups Shredded Coconut
1/2 cup applesauce {GoGo SqueeZ are always on hand in our home, and one pouch is just under a 1/2 cup so works perfectly}


In a large bowl add your oats, flaxseed, chia, and coconut.  Then mix in a separate bowl mix your wet ingredients.  Add your wet ingredients to the dry, mixing until coated evenly.  Spread on a parchment or slit mat baking sheet.  Bake at 325 for 45-60 mins {until golden brown} , mixing it every 10 mins to avoid burning. Remove and let cool. Now this toasts the coconut, which is not how the Nature's Path is, so an alternative way to make it would be to add the coconut once cooked. This makes around 6 servings at 1/2 cup.  {see nutritional facts below, not listed is fiber which is high in this}


My favorite way to eat it, is with 1/2 cup Silk Almond Vanilla Milk, half a banana and some blueberries.  


I hope you enjoy this!! Hope to see you around more often....

Tuesday, November 27, 2012

Elf on the Shelf Door on the Cheap, $3 to be exact.


Lenny our Elf does not make his official appearance until Dec 1.
But in prep for his arrival, he has requested a door for easy access to and from the North Pole.
See we are finding at 6.5 years of age Buggie has A LOT of questions about how things work, and if they are real.
And this Momma is NO WHERE near ready to give up the magic.
So I went to Joann's and came home with the workings of a Elf Door.

For $3 I came up with this.
- Picture frame $3.99 but after a 40% off coupon paid $1.80
- Bag of little knobs $1.99 but after my 40% off coupon paid $1.20
- paint which I had already
- bag of sticks which I had, but are around $2
- hot glue gun


After measureing the sticks to the back of the frame I was able to just cut them with regular scissors. 


Then painted everything and hot glued it together. 


And added a "Elf Only Entrance" to it. And I was done, yep that easy and that cheap.


When Lenny comes Saturday he will come with a little note explaining the door and that Santa felt it was a good addition for the Elves. 

Fingers crossed that this helps keep the magic alive and filling our house this Christmas!

Thursday, November 15, 2012

Nolan's Big Bad Monster Truck Bash


I am still trying to come to terms with the fact that my little man turned three last week.  I honestly have NO idea how it happened so fast.  One day my water was breaking and the next I am planning his 3rd birthday.  But lets keep it real, the kid is still in diapers and sleeps in a crib {we did order a big boy bed this weekend} the diaper thing we are working on, so I guess he is still a baby in some ways...

He is a boys boy, in that he is WAY into trucks, car, trains, and pretty much anything that moves.  When we asked him what kind of party he wanted his first and only response was "monster trucks".
And if you know me from parties past, I am always teaming up with my girlfriend Kori. Paper and Pigtails to make party magic. After choosing colors and a concept, Kori went to work and I starting gathering, buying, and spray painting , the things I do best.


For his backdrop I wanted something that made me think of a winners circle at a Monster Truck Rally. I took him to a local car parts store that always has a "monster truck" outside, and after getting permission to take a few photos, I took the winning image to Staples and had them print an engineer print.  They were able to scale it just almost fit perfectly on a piece of foam board I had purchased, total cost for the board and print was $10.  


Then I took spray adhesive and worked from the top down in sections.  Once it was on, I took tissue paper and hole punch it to make confetti and then glue sticked it down.  


Right after we chose Monster Trucks, I was at Target and they had these trophies in the dollar bin {they were really $2} for Halloween costumes.  The water bottle labels Kori made fit perfectly on the base.
Then I took pans I got at the Dollar Tree and spray pained them, finally I Gorilla Glued them together to create a CHEAP but fun cupcake stand!


I love the idea of bite size cookies as cupcake toppers, like I did here, and Renee from Bee's Knees Creative made that happen yet again with these little tires.  She also made an amazing "BIG" cookie for Nolan.


Other treats included "Mud Buddies" in my oh so favorite snack cups from Kori.


Chocolate Doughnut Spare Tires


LARGE Marshmallow Bolts {Take marshmallows on paper straws, quickly dunk in water, then roll in sugar sprinkles.}


Oreo Pop Rocks, because I can NEVER have a party without them, people will not come. 


Brownie Dirt Ramps aka boxed brownie mix made from the directions but added crushed peanut butter Oreos on top before baking.


And for good measure we bagged up some popcorn to add a little bit of salt after so much sweet.


And just to finish things off I got paper fans and streamers from Party City for the backdrop.


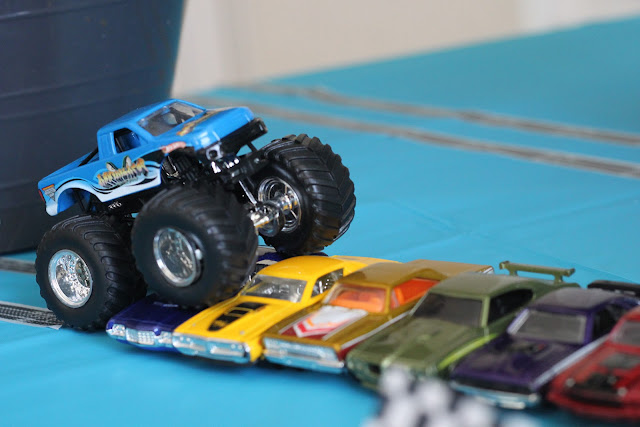
And of course add some Monster Trucks and their tracks to the table.  I scored the tire track tape here.


And lastly was the favor table. Being the week after Halloween I was not about to give candy. So I found these monster truck tire cups, mini trophies, and monster truck tattoos, on Birthday Express.

I also purchased some checker duck tape from Micheals, I wanted to buy fabric but the tape was SOOO much cheaper after my 40% off coupon.  I added it to my mirror then hung photos of Nolan on it.  It was easy to just add throughout the tables.


The cups came with a monster truck sticker on the front and back, but I decided to cover it.  I took the party circles Kori made, printed them on sticky paper and punched them out. I also used them on the blue and yellow traffic cones I scored at the Dollar Tree.


For the "Winners Circle" sign I used this DIY from Smile and Wave. 


I hope you are all still with me after such a long post.
And if you are then you will her me say, it was a success.
From my friend Kori's partnership in creating fun paper goods, to the DIY's, to the weather, to the food, to my sweet little three year old boy!

Please free to ask any questions!

PS:
I made his shirt, using a freezer paper stencil and some black fabric paint.

Monday, July 9, 2012

DIY $8 Glitter Anchor Tee

Nautical is back, but honestly has it ever gone away?
I mean it is such a classic, not sure it can ever really be out of style.
The other day at Target I grabbed a $8 gray crew neck tee and knew I wanted to add an anchor.
So I googled anchor images, printed one I liked and got out my freeze paper {aka ghetto stencil maker}.

Other things I used:
-pencil
-exacto knife
- fabric glitter glue
- fabric glitter


First thing you will do is trace your stencil out on the freezer paper.


Then with your knife cut out the relief portion of the paper, creating your stencil.  And remember to keep any pieces that make the image, like the little circle in the top of the anchor.


Then after laying the image out, iron it wax side down on your shirt. No steam with the iron.


Add glue and then sprinkle with glitter.


What the time the bottle says, then remove your stencil.


Then you will have a super cheap, super cute glitter anchor shirt.
AHOY MATY!


Enjoy!