



PhotobucketPhotobucketPhotobucketPhotobucketPhotobucket
Showing posts with label easy. Show all posts

Monday, August 4, 2014

Easy GIANT Bubbles

We have been struggling this summer with getting ALL our items checked off #OurSummerFunList.
With 15 days I am feeling the pressure.

Last night we decided to mark make GIANT bubbles off.
I found SOO many recipes, but at 5pm none of them were as simple as soap.


Then I came across this one.  
I used the dawn ultra, which is concentrated, so I used 8 cups of warm water and 1 cup of soap.


And for the wands, we used this DIY.  But when we started we were running into an issue where the twine would not open, we added a few washers to the bottom string to weigh it down.


After our friends on our street saw our bubbles over the fence we moved it out front and had bubble fun with everyone.


 It was much easier then I thought for the kids to get the hang of it. Wind did play a factor, when it started to pick up a bit the kids found it harder to get the bubbles from popping right away. But over all I think this simple recipe was worth not driving around at 5pm on a Sunday to find glycerine.

____________________________

I have a winner for the Winervention, Lesley from Recipe for Crazy.
Thanks to all those who enter!
_____________________________

Avery's super cool Fiona Apple Extraordinary Machine Tee can be found here.


Monday, October 7, 2013

Skull Cake Stand

Hello.
Been a minute since I have blogged.
Sorry.
But did a little Halloween craft on the cheap the other day and thought I would share.

What you need:
Plastic plate from Target for $1.99
Glitter skulls from Michael's $1.99 for a package {I used my 40% off coupon to make them even cheaper} X2
A candle holder, I had one on hand.
Some gorilla glue
Hot glue gun


First thing first, gorilla glue the plate and stand together, add something heavy to the top and let sit till dry.


Then with a hot glue gun get to adding some skulls around the edge.


And thats it.  
Doesn't get easier then that I say.


Enjoy!

Thursday, August 22, 2013

Week of lunches with Applegate Day 4 {Genoa Salami Caprese Skewers}

I think my favorite part of blogging Applegate lunches this week has been honestly how fast they come together.
Take for example todays.
Salami, tomato, cheese, stick it on a skewer and call it a day.
Pretty much that easy people.


Added a little hummus and falafel chips plus some berries.


How stinkin cute is food on a Hello Kitty Skewer?! I mean come on...


Now as for the second half of this post I to start off by saying this,
I CAN NOT STAND HOTDOGS.
Unless they are crisped to near death I will not touch them
Mostly cause they freak me the heck out.
And poor Nolan loves them.
But once you read over Applegates Organic Beef Dog, most of my fears we set at bay to have a clear conscious of feeding him them.
But just so we are clear, I will still need them suckers BURNT.


He was stoked for what we call his "Dragon Dog"
He took him and wrapped him the castle bread.


One more day left and we will have officially concluded the first week of school, CRAZINESS!

Organic Genoa Salami and The Great Organic Uncured Beef Hotdog
provided by:


Tuesday, August 20, 2013

A week of lunches with Applegate {Day 2 King of Jungle fun lunch and mini tacos boxed lunch}

For day two I am going to share a fun plate and a lunch box idea.
Bean is starting school today, its cool, I am ok promise.
I am mostly nervous about forgetting one of them. 
So here is what my day will look like,
I sit,
I stand,
I check the time,
I sit again,
I turn the TV on just to check the time,
pretty much on repeat until it will be pick up time.

But yesterday I made him a fun lunch while Sisty was at school.
For his plate I used Applegates organic black forrest ham and organic cheddar cheese.
Have I ever mentioned my love affair with cheese, its pretty bad.
So when I say Applegate has some of the yummiest prepackaged cheese, I know what I am talking about here folks.


I made a grilled cheese with the ham and cheese, then cut the bread in a circle. Adding some cooked frozen corn around for the mane.  


Two blueberries and some red pepper completed the face.  Broccoli florets made for some cute little trees.  The red peppers at the bottom had no real purpose other then Bean loves his "chippers" so we will pretend they are rocks.


Some hummus added a little extra for dippin his veggies.  I use squeeze bottles for this, makes it easy to write on the plates and add designs.  


His favorite part is making up stories about his plates, this little Lion, turned into an alien Lion after he eat one of his eyes, and was on a planet with "wittle guys" carrying "wight sabers"...oh having boys is SOO different then girls, hahaha.


As for Buggie today she brought her most favorite food ever, tacos.
Applegates southwest grilled chicken is crazy good, yummy flavor and no slimy gross texture a lot of those packaged grilled chickens get.  I think my favorite part of this lunch was I could make it the night before without worry of anything getting soggy.  


Some whole wheat tortillas, salsa, guac, and greek yogurt {our substitute for sour cream} round out the tacos.  Added a little real fruit leather for something sweet and called it a day.  A filling well rounded meal that took all of three mins the night before to put together. Now I cannot wait to throw some of this chicken on a salad, yum. 


See you back tomorrow! 

Organic Black Forrest Ham, Organic Cheddar Cheese, and Grilled Southwest Chicken provided by Applegate.

Wednesday, July 31, 2013

Flank Steak Asparagus Bundles {Clean Eating Day 2}

Someone asked me yesterday "Why clean eat, when you don't need to lose weight?"
Clean eating for me is not a diet to lose weight, but a lifestyle change.
A change to be more mindful of what our bodies are consuming.
I can pronounce and accountant for every ingredient my body took in yesterday.
Thats a winning day in clean eating for me.

Last night I made this little bundles.
Super simple and yummy.

Flank Steak Asparagus Bundles {makes 8 bundles}:
- Flank Steak around 1.5lbs
- 2 garlic cloves crushed
- 3 tsbp olive oil
- a bundle of thin asparagus

I took the flank and cut it down the middle making to flanks
Then trimming any fat, cut strips about 3 inches wide.
I laid the strips out covered with some wax paper and took my handy dandy pot and tenderized them.
Then sprinkle with some salt and pepper.
Add to a ziploc with garlic and olive oil, give the bag a good massage.
Set aside, for 30 mins.

In the meantime preheat your oven for 350.
Trim the asparagus, add to a lined baking pan, add a little olive oil and s&p.
Bake for 15 mins.
Remove and cut them in half.

I used my grill pan on medium heat, a grill would be great also.
To make the bundles, take the strips add some asparagus to one end and roll up.
You will not want any over lapping, so trim as needed and secure with a toothpick.

Grill, these are thin so not very long on each side.

I served ours with a side of tomato and cucumber.
Just tossed with a little apple cider vinegar and olive oil, then sprinkled with salt and pepper.


One thing I have noticed with focusing on clean eating, we have been eating clean for the most part. Or should I say at mealtimes.  But snacks are a completely different story.  Yesterday I snacked on a dragon fruit, apple with almond butter, Larabar, a banana, and a juice of beet, kale, carrot, and a red apple.  I am working on thinking of more out side the box snacks, any suggestions?


See you back tomorrow...

Tuesday, November 27, 2012

Elf on the Shelf Door on the Cheap, $3 to be exact.


Lenny our Elf does not make his official appearance until Dec 1.
But in prep for his arrival, he has requested a door for easy access to and from the North Pole.
See we are finding at 6.5 years of age Buggie has A LOT of questions about how things work, and if they are real.
And this Momma is NO WHERE near ready to give up the magic.
So I went to Joann's and came home with the workings of a Elf Door.

For $3 I came up with this.
- Picture frame $3.99 but after a 40% off coupon paid $1.80
- Bag of little knobs $1.99 but after my 40% off coupon paid $1.20
- paint which I had already
- bag of sticks which I had, but are around $2
- hot glue gun


After measureing the sticks to the back of the frame I was able to just cut them with regular scissors. 


Then painted everything and hot glued it together. 


And added a "Elf Only Entrance" to it. And I was done, yep that easy and that cheap.


When Lenny comes Saturday he will come with a little note explaining the door and that Santa felt it was a good addition for the Elves. 

Fingers crossed that this helps keep the magic alive and filling our house this Christmas!

Monday, September 10, 2012

DIY Skull Tees {and guest post}


Today I have the honor of guest hosting on the eighteen 25 girls blog!
They have a spooktacular September, and everyday posting great Halloween projects and giveaways.
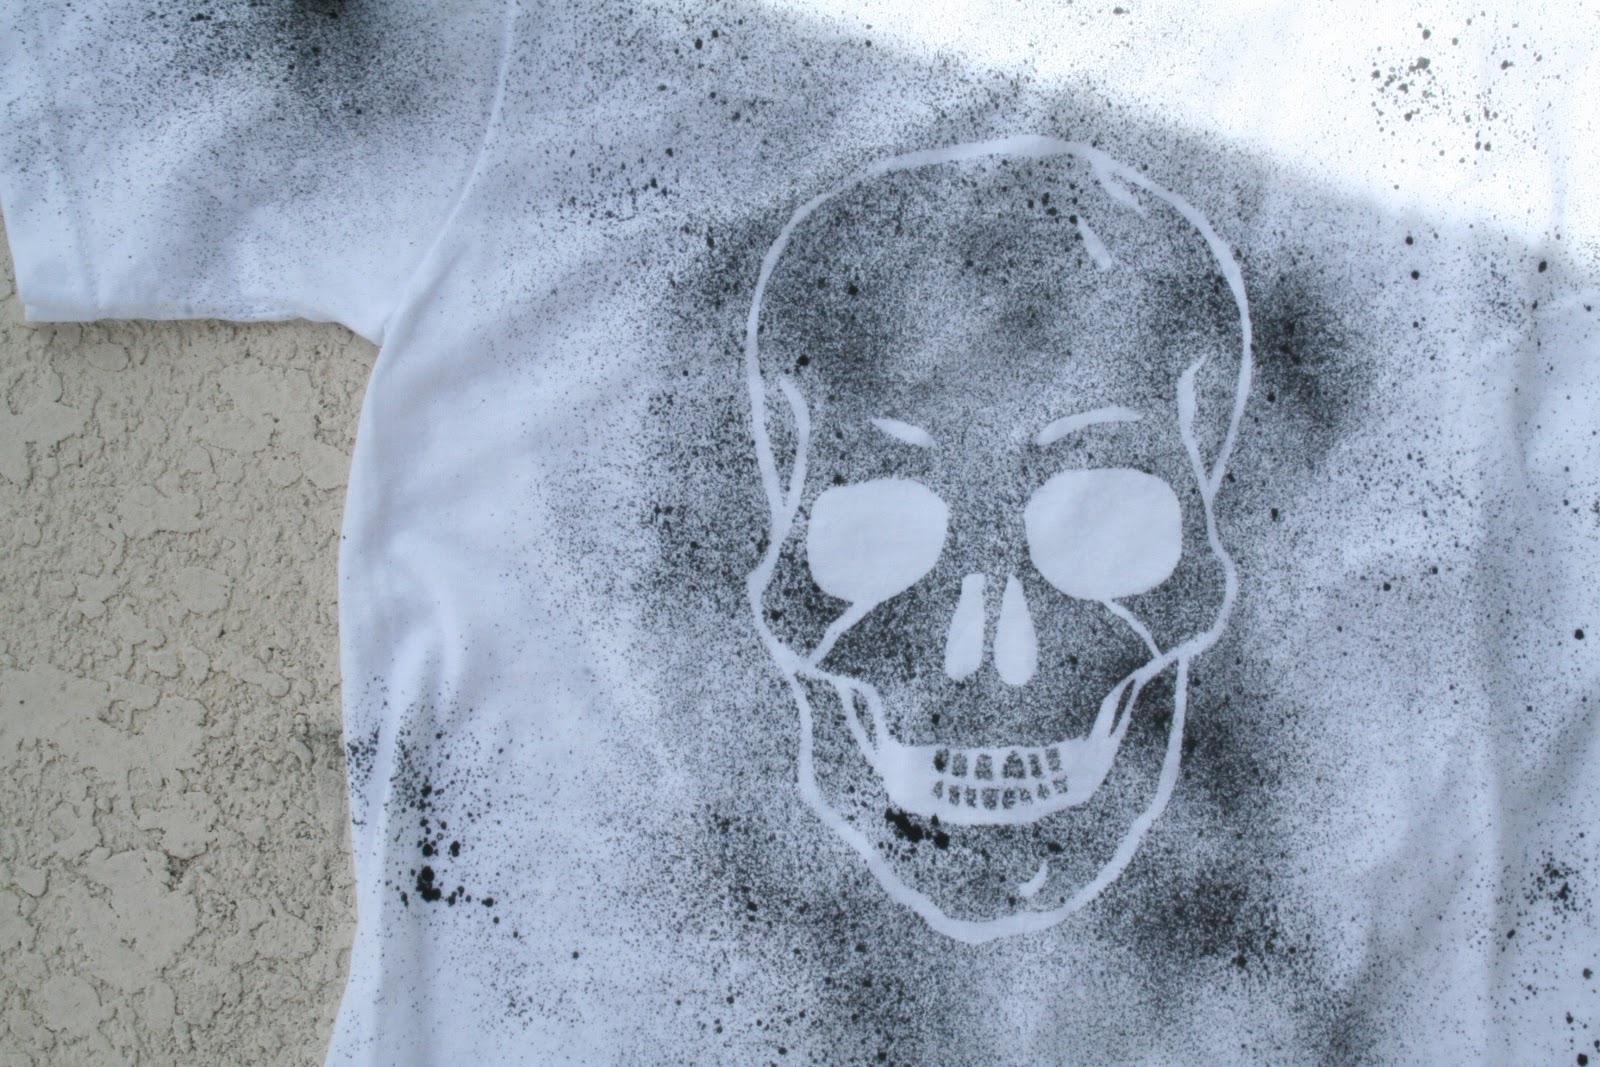
After making my project for them, my mind started turning and thought it would be cool to make some tees.

But instead of using freezer paper, cause the thought of recutting the stencil over and over made my head hurt.  So I came up with another approach.

I took a plastic divider and cut a reusable stencil out of it.
For my details on cutting out the stencils check out my guest post.


Then to stick it on I used a little double sided tape. Just cutting around the stencil so it fit the back.


And for this project I made two different versions, a bleached one {which again check out my guest post for details} and a black dye version. Which is pretty straight up, stick the stencil down and spray.


I cut the neck off mine and the bottom 3 inches off.  And then took some gold paint and gave mine a gold chompers.  


{photo credit to my sweet husband who walked away from the TV on the first football Sunday of the season to take these for me}

They rock the casbah!

Again to see how this skull madness started head over to eighteen 25 to see how this "cool guy" was made... 


Here are a few projects of Halloween past:

http://eighteen25.blogspot.com/2012/09/please-welcome-amy-from-buggie-and.html

Tuesday, January 24, 2012

Valentine's Day Chair Pockets {DIY}

I love a DIY project that I have EVERYTHING I need on hand.
Can you imagine, something you do not need to get dressed and drag your kids to Joann's, to get one single thing for?
EEP, that happened to me!
Here is my SUPER easy Valentine's Day Chair Pockets.


What I used:
- Felt cut 8 in. wide x 21 in. long
- Twine or embroidery floss {I use Twinery Twine}
- embroidery needle
- embellishments {this part is totally up to you}
- ribbon, long enough for two straps to tie on the chair backs.
- fabric glue

First thing I did was draw out the kids names and cut them out.


Then I folded the felt with a 2 1/2 in flap.


Then I decorated the flips with a trim and their names.


This part I did backwards, but I would suggest sewing the ribbon on BEFORE you stitch the side of the pocket together.


Then I did a blanket stitch up the sides with the twine. Click on my post here to learn this SUPER easy stitch.

Then after adding some embellishments,
my kiddlets had their own Valentine's Day Chair Pockets!


For Nolan's robot, I just cut up felt.


And for Avery's I had a flower from Ikea laying around that needed a home.


So there it is, a SUPER easy little DIY.

ENJOY!