Friday, October 29, 2010

Can you believe...

Halloween is Sunday?!

I can't.
Denial.
Whatevs.

Check out this video of my Uncle craving his families pumpkin this year.
Talented right?

Thought it would be appropriate to share a few shots from our trip.
Can not travel to Boston and not hit up Salem the week before Halloween.


{They thought it was a maze, lets just say we kept that like that.}
It is just as witchy and Halloweeny as you would think, SUPER fun.

Have a safe and fun weekend.

XO

Thursday, October 28, 2010

Mom in the shot Oct 28th {All bundled up}

Had a little time off over the past week.
A much needed break and trip up north.

{sorry for the out of focus shot, Hubby swore it was a good one, HA}

More on our trip later, I am sure you all are dying to see my vacation pictures, BAHAHAHA!

You know the deal, I participate with Emily.
If you are cool, you will too.

Thursday, October 21, 2010

Mom in the shot Oct 21 {Ok really Dad in the Shot}

Hubby doing a fierce Bean impression.
I love my twin boys.

Share in the fun head over to Em's to Embrace the Camera with her!

Wednesday, October 20, 2010

All my ducks in a row. DIY

Bean's 1st birthday is fast approaching.
I am TRYING to contain myself and not go OVERBOARD.
BUT lets be honest peeps, thats not me.
I love this stuff and the stress it brings.
My Hubby, can be quoted as saying this at least once during any
thing I am planning or making "Why do you
put so much into this stuff? All it does is stress you out."
And my answer EVERY time is this "STUFF" makes me happy, mkay.

So I have been in happy land planning this week.
One little DIY I had planned was making soap rubber duckies.

Here is what you will need:
- Rubber Duckies {mine were purchased from Oriental Trading, they have a HUGE
selection of themed ducks}
-Package of soap 32oz {I used pure glycerine, I did not add any coloring or perfumes.
As I knew some kids coming have skin irritations and allergies.}
- Soap mold
- Deep baking dish
- Ice and water


Melt the soap per the bags instructions. I used the microwave directions, very easy.
Pour ice water into the baking dish and place the mold into the water.


Place a duck in each mold and pour the melted soap. The ice water will set the soap pretty quickly. You should be able to remove the soap duckies within 5 minutes.


This was so simple and easy, I will be doing it again for sure. You can
do these for little gifts for school, PERFECT! I am going to package them up and they will be favors.
Please let me know if you have any questions.
Enjoy!

Tuesday, October 19, 2010

Living in the moment...

I try to make life spontaneous.
As much as I love schedules, making lists and my calendar, living off the
path brings a HUGE smile to my face.

Last Friday went like this.
I had a thought.
Made a call to my friend across the street.
"Hey, want to come over and play? I am going to let the kids
paint the driveway. Yes you heard me right. Dude finger paint, I am not that nuts."


Bean hung out under the tree, doing what he does best snacking.

Messy was understatement. But we LOVED every second of it.

While this was happening another spontaneous moment was in the works...

My girlfriend and I decided to clean them up, pack them in the car, and take them to Disney.

We got out there late. Rode the race cars, caught the parade, and saw the fireworks.


Living spontaneously can bring a breath of fresh air to your life. So I dare you, scratch that I double dog dare you, to do something off the cuff, out of your norm this week.
{pulling into the driveway at 1am}

You will not regret it.
XOXO

Monday, October 18, 2010

Formally known as...


Ok, made a little name change to my weekly post.
We are going from Mention Me Mondays to Blog All About It.
With the name change comes a cute little button...


I started this weekly post to share. And my first blog is ALL about sharing.
The lovley ladies over at HowDoesShe? have created three incredible hubs for all of us to share printables, crafts, and recipes ideas.

Check them out.

Side note if you subscribe to HowDoesShe? you will get some fun free printables from the talented Chickabug.

I heart me some photography. I pretend to be a photographer. I know I am not, but its fun to pretend. I stumbled across a Dad who does not have to pretend.

Jason Lee started his blog back in 2006 when his mother was diagnosed non-hodgkins lymphoma so she could she her grandkids without being exposed to their germs. Read a interview with Jason here.


You can see more images at the sisters blog. Enjoy, I know I did.

Do I want on these?!
Why, yes please. But which one?
Gabby from Gypsy Diaries just open Blog Couture, I wish her many blessings of success!

Hope you enjoyed this weeks Blog All About It.

PS
My cousin is new to the blogosphere.
She is Hi-larry-us.
Please go give her some bloggie love and welcome her.

Total and Winners announced....

Head over to Emily's to see
the total raised and
see if you won...

XO

Sunday, October 17, 2010

Reminder and Update.

Today is it, the LAST day to donate and enter to win one of these beautiful bundles.
Please note there has been a slight change in how you can donate, PLEASE READ THIS.


Thank you to everyone who has donated already. Emily and I excited to share the final total tomorrow and announce the winners!

Lots and lots of LOVE!

Thursday, October 14, 2010

Mini Notepads DIY part dos

Yesterday I shared the mini notepads I made.
Today I am sharing the little holders to accompany them.
Wild Olive had a post the other day that had my mind racing, so here is my take on
her DIY.

What you will need:
- Your mini notepads
- Felt
- Ribbon
- Buttons
- Needle and Thread
- Hot Glue
- Scissors
- Straight Edge
- Pencils or Crayons

Step 1:
Lay your pad on the felt and mark about a 1/4 of an inch from the edge of the pad on each side. Fold the bottom up to make a little pocket.

Step 2: Cut the edges making sure you have enough from the top to fold over the pad.

Step 3:
Glue the ribbon down, making sure the ribbon will be covered by the pocket. Then lay your pencil down on the ribbon.

Step 4:
Overlap the ribbon and glue down. Making a snug enough loop to hold the pencil but still easy to get it in and out. Should look like the picture below.

Step 5:
Put a thin line of hot glue down the sides for the pocket and fold together. Then sew on a button on the pocket.


Step 6:
Stick your notepad in the pocket and fold over the flap. Lift up the flap and mark where the button is located.

Step 7:
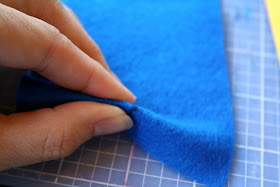
Pinch the mark, take scissors, and cut a slit big enough for the button to fit.


You should have something that looks like this...


Having a playdate today and giving these to kids. Thinking of letting them decorate the flap?!

Wednesday, October 13, 2010

Bundle Update {a must read!}

Emily and I excited to announce the addition of The Twinery to the
Share the Love Week!

Here is what is being added to each bundle:
Red, Green, Brown, and Teal

Pink, Purple, and Teal

Teal, Yellow and Orange

Brown, Red, and Yellow

Teal, Brown and Yellow

This has bumped up the value each bundle quit a bit go check it out!

Mini Notepads DIY part uno

Have you ever made your own notepads?
OH MY LANS, beyond easy.

What you will need:
- Paper {I used a craft paper from Ikea 12 sheets
per book but you can use as much as you would like}
- Aleene's Tacky Glue {So I had a bottle for about 6 yrs that was
in a container in the garage, with no cap on it. And it was still GOOD! HA}
- Binder clips


First you need to cut the paper to the size you would want.

Then stack the paper and make sure the paper is level {bang it on the table to get it level}. Put a bead down the top of the paper. With your finger spread evenly across the top.


Stick a binder clip on the top of the paper. Let the glue dry for a few hours.

Once dry you will have little notepads!!

I will be back tomorrow to show what I did with these little cuties.

Do not forget to participate in the AMAZING fundraiser going on
over at Emily's blog.
Here is the links to all the bundles:
Craft/Hobby Bundle Valued at $359
Girl Bundle Valued at $480
Home/Decor Bundle Valued at $581
Boy Bundle Valued at $378.50
Accessories Bundle Valued at $545

I did the math for y'all, thats $2343.50 worth of AMAZING products.
Oh and update Le Papier Studio GC for $40 has been added to the boy bundle.


Tuesday, October 12, 2010

Last bundle just posted, accessories.

Valued at $545, this bundle does not disappoint.
And your eyes do not deceive you, that is a the vintage pearl gift certificate {I will let you
head over to the bundle to see how much for, lets just say I am JEALOUS big time.}


Clutch: LBG Studios
Pleated Posie Clips: The Pleated Poppy
Mini Wallet and matching Receipt Holder: Elliven
Headband and Phone Pouch: Gussy
2 Key chain Wallets with Africa design on them: Moonpie Designs
Diaper/Tote Bag and Hat: Gardenhouse Boutique
Tissue Tote: Tracy B Designs
Large Grey Flower Pin and Fabric Flower Headband: Elizabeth St.
Bird Pouch: Written in Thread
Navy Blue Neck Cowl: Sew What by Saira
Peacock Headband: Cassie Meitzler
Fabric Flower Necklace - THE emily anderson
3 Changeable Hair Flowers and Headbands: The Bloomin' Boutique
Large Flower Fabric Clip: Jami Nato
$100 gift card to the Vintage Pearl
2 Halloween Collection Printables: The Tom Kat Studio


More entries for you!

One of Emily's best friends is doing something amazing. She is matching donations up to $20. Such means more entires for you, head over to her blog and read all the details {it is beyond simple}.
The love flowing this week is AMAZING...